
Most IT admins will be familiar with the term RBAC to some degree, but let’s have a quick recap.
Role-Based Access Control is about taking back control of administrative privileges and ensuring users or administrators only have the access they actually need to perform their role, usually aligned with the principle of least privilege.
Yes, that was the pun in the title. Taking (r)bac(k) control. If you clocked it, good. If not, I will have to try harder next time.
RBAC should exist across every IT system you manage. But it becomes especially important in platforms with powerful controls and actions, such as Microsoft Intune. A misconfigured role in Intune is a material risk. A user with incorrect access can wipe devices, retire assets, remove or create policies, or expose sensitive data.
Getting this right may not be the most exciting topic in the world, but it is very important. In this blog I will cover key decision points I believe you need to make in your RBAC model, from the very beginning to stand you up for long-term RBAC success.
First Things First – Entra Roles Are Not Intune RBAC
If you are new to RBAC in Intune, there is one foundational concept that trips people up. Built-in and custom roles in Microsoft Entra ID are not the same thing as Intune RBAC roles.
Entra roles live under: Microsoft Entra ID > Roles and administrators
They control broader directory and tenant-wide permissions. The confusion happens because some built-in Entra roles, such as:
- Intune Administrator
- Cloud Device Administrator
- Security Administrator
… do grant differing levels of access into Intune.
But if your goal is granular control inside the Intune portal itself, this is not where you should be operating. Intune RBAC controls what someone can actually do inside Intune.
For Intune RBAC, head to: Tenant Administration > All roles
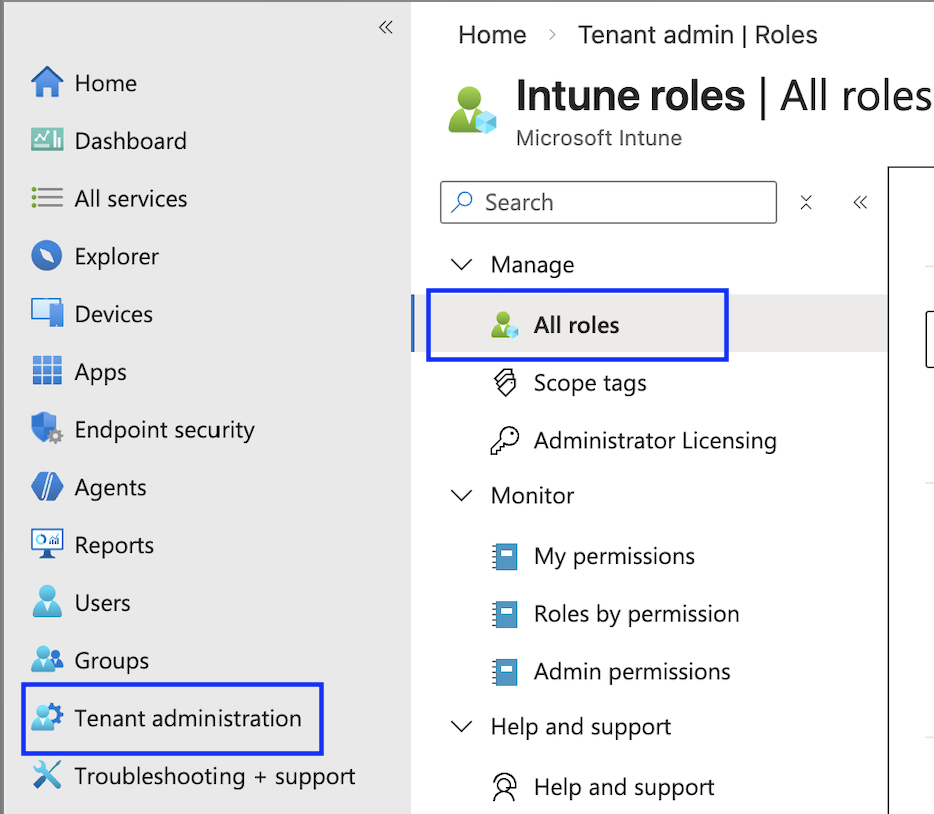
This is where the Intune RBAC model lives, and this is where the first real decision begins.
Before we get in to this blog too much further, I need to let you know that I won’t be telling you how to click through each individual page and setting within the Intune interface to configure roles, this isn’t a how to – there’s plenty of those online already and its pretty intuitive. Here, we’re focussing on design decisions and strategy.
Built-In Roles – The “Microwave Meal” Option
Let’s start with built-in roles. This will be the first thing you are greeted with when browsing to the roles section.
Built-in roles are a bit like a microwave ready meal. They are quick, convenient and, for some organisations, they will do the job. They are not perfectly tailored, but they cover common scenarios without much effort.
Microsoft provides a range of built-in roles:
- Application Manager
- Endpoint Privilege Manager
- Endpoint Privilege Reader
- Endpoint Security Manager
- Help Desk Operator
- Intune Role Administrator
- Policy and Profile manager
- Read Only Operator
- School Administrator
Each role bundles a predefined set of permissions. You assign it, scope it, and you are done. Here’s a granular breakdown of the exact permissions: Built In Intune Roles.
However, here is a key point. You cannot edit built-in roles.
If you roll out the Help Desk Operator role and later discover it is missing one permission your Help Desk needs, you cannot tweak it. You either live with the limitation or move everyone to a custom role.
Custom Roles – The “Cook It Yourself” Option
Custom Roles are the home cooked meal.
They take longer. You need to know what you are doing. You might make a mess the first time and need to come back, sometimes more than once, to tweak the permissions. But when done properly, they are exactly what you wanted.
With custom roles, you decide exactly which granular permissions are included. Nothing more, nothing less. You are not accepting Microsoft’s idea of what a Help Desk operator should be allowed to do. You define it yourself.
This often means working with the relevant teams, and potentially your security function, to clearly define what Help Desk or Level 3 Support should actually be allowed to do in Intune.
The upside is precision. The downside is responsibility. You now own:
- Designing the role
- Testing it
- Maintaining it
- Adjusting it as Intune evolves
Decision one – Built-In or Custom Roles?
At this point, you need to make an early decision. Do you opt for convenience and stick with built-in roles that cover common use cases? Or do you invest the time upfront and create custom roles that align exactly with how your organisation operates?
Neither approach is inherently wrong. But, the right answer depends on several factors:
- The size of your IT team
- The separation of duties you require
- Audit and compliance expectations
- How mature your operational model is
However, there is one thing I want to be very clear about. If you start with built-in roles, you must understand their limitations from day one. Because when you eventually hit those limitations, you are not tweaking permissions easily, you have to redesign your model.
My Recommendation?
Personally, I would bite the bullet. Put in the hard yards and go with custom roles, even if you start by duplicating the built-in ones.
Why? Because later down the line, when your requirements change, you can edit them. You are not boxed in.
Realistically, the likelihood of a built-in Intune role fitting your exact requirements now and continuing to fit them in six or twelve months is slim. Organisations evolve. Teams change. Requirements tighten. Intune itself changes.
As a result, if you build with flexibility from the start, you are future-proofing your RBAC model rather than reacting to it later.
The only built-in role that I really like is: “Read-Only Operator”, as it does exactly what it says on the tin, if you need to give someone full read only to Intune – use this.
Decision two – Roles per Activity or Roles per Team?
Once you have decided how you are going to build your roles (and ideally, that means custom), you need to decide how you structure them.
In my experience, there are two main approaches. And yes, I have a clear favourite.
Option One – Activity-Based Roles
This approach is activity-led. You take permissions that relate to a specific functional area and bundle them together into roles such as:
- Application Packaging
- Device Management
- Endpoint Security
- Compliance Management
The idea is simple. You create modular roles based on what the activity is, not who performs it. Then you assign multiple roles to a team. Because Intune RBAC permissions are cumulative, if you assign three roles to a group, the effective permissions are the sum of all three.
So, for example, if your Engineering team is responsible for everything in Intune, you might assign:
- Application Packaging
- Device Management
- Compliance Management
All of those combine to give them the access they need. On paper, this looks flexible and feels reusable. For smaller environments, it can work well.
However, here is where it gets complicated. As organisations grow, teams start to look similar but not identical. One team might need 95 percent of Device Management permissions, but not the ability to retire devices. Another might need everything except policy deletion.
Because roles are cumulative and cannot contain “deny” permissions, you cannot subtract rights. If a function-based role contains a permission, anyone assigned that role gets it. Full stop.
So what happens? You either:
- Create more and more micro-roles to compensate
- or
- Start duplicating roles with minor variations
Over time, what started as “simple and reusable” can become fragmented and difficult to manage
Option Two – Team-Based Roles
This approach is identity-led. Instead of building roles around activities, you build them around actual teams in your organisation.
You sit down with:
- Help Desk
- Engineering
- Third Line Support
- Security
And you define exactly what each team should be able to do inside Microsoft Intune. Then you create a dedicated custom role per team. I strongly prefer this model. Why?
Because it aligns directly with the principle of least privilege. Each role is tailored to the real operational boundary of that team. There is no stacking of unrelated roles and no accidental overexposure because of cumulative role behaviour.
It also makes governance cleaner.
When audit or security ask, “What can Help Desk do in Intune?”, you point to one role. Not three stacked functional roles that you then need to work out. From an operational maturity standpoint, this model is easier to explain, easier to review, and easier to adjust during annual access reviews.
Other Considerations
Now that you have worked through what I consider to be the two key design decisions in an Intune RBAC model, there are a few additional considerations worth calling out when it comes to actually assigning your roles.
Nothing as foundational as the previous sections, but important enough that you should not ignore them.
Scope Groups
After you create your roles, you need to assign them. During that assignment process, one of the first screens you will encounter is Scope Groups. This is where you define what objects the role can operate on. There is an important distinction here:
- The role defines what actions someone can perform, but
- Scope groups define where they can perform them
If you want the role holder to operate across the entire tenant, you simply select:
- Add all users
- Add all devices
In many organisations, that is perfectly acceptable, especially for centralised engineering teams.
However, there are scenarios where scope groups becomes useful, if you have a genuine reason. For example:
Imagine you have a dedicated VIP support team. You want them to be able to perform remote actions, modify policies, or troubleshoot devices, but only for a defined set of VIP users.
In that case, you could:
- Create a security group containing VIP users and their devices
- Assign the role
- Scope it only to that specific group
The result is the team has capability you set within the role, but only within a defined boundary of that VIP group.
The trade off is that they add overhead. Someone has to:
- Design the scoping strategy
- Create and maintain the groups
- Ensure membership remains accurate
- If those groups are not maintained properly, your RBAC model slowly drifts away from its intended design.
That is why I say use them for a genuine reason. To be clear, scope groups do not reduce the permissions inside a role. They only limit the objects the role can interact with.
If a role allows device wipe, it still allows device wipe. It just limits which devices can be wiped.
Scope Tags
If you have read anything about Intune RBAC beyond this blog, you may have been thinking:
Why has he not mentioned Scope Tags yet? That is deliberate.
Scope Tags deserve real consideration before using them. In many environments, they introduce complexity far earlier than they deliver value. That is why I am covering them briefly here rather than front-loading them into the core design decisions.
What Are Scope Tags?
Scope Tags are labels that you define separately and attach to Intune objects. Those objects can include:
- Devices
- Policies
- Compliance policies
- Configuration profiles
- Applications
- Even Intune roles themselves
There is also a built-in Default scope tag. Any object without a custom tag automatically falls under Default.
You can assign tags:
- Manually to individual objects
- or
- Automatically via group-based assignment (for example, tagging all devices in a specific group, dynamic or static)
That sounds straightforward. The complexity appears when you combine Scope Tags with role assignments. Because Scope Tags do not control what someone can do. They control what objects they can see and manage inside the portal.
When Do Scope Tags Make Sense?
You should be asking yourself two core questions.
- Do I have distinct technology stacks managed by different teams?
For example: A Mobile team managing iOS and Android and a Windows team managing physical Windows devices and Windows 365 Cloud PCs
If the answer is yes, Scope Tags can be useful.
You could:
- Tag all mobile devices and related policies with a Mobile tag
- Tag all Windows devices and related policies with a Windows tag
- Assign the relevant tag to each team during RBAC role assignment
Now, even if both teams have the same permissions (for example Device Delete), they can only apply that action to objects that carry their tag.
The Mobile team cannot delete Windows devices. The Windows team cannot modify mobile compliance policies.
- Do I have geographically separated or regionally structured teams?
For example:
An EMEA Intune team and a US Intune team. Both teams perform the same administrative tasks. However, they operate on different sets of devices and policies.
In that scenario, you could:
- Tag EMEA devices and policies with an EMEA tag
- Tag US devices and policies with a US tag
- Assign each team the same RBAC role, but limit them using different Scope Tags
This allows identical permission sets, but segregated visibility and control.
That is where Scope Tags are useful.
Why I Call Them Complex and advise consideration is because they add another dimension to your RBAC model.
You now have:
- Role permissions
- Scope Groups
- Scope Tags
And they all interact. If you do not design tagging properly from the start, you can end up with:
- Objects that are invisible to teams unexpectedly
- Policies that cannot be edited because the tag does not match
- Administrative confusion about “why can I not see this?”
Also, don’t forget – Scope Tags must be applied consistently across all related objects. Tagging devices but forgetting to tag the policies that target them defeats the purpose.
My recommendation?
If you do not clearly fall into one of the two scenarios above, leave Scope Tags alone.
Let everything inherit the Default tag. Use RBAC roles and Scope Groups to handle access control. You can always introduce Scope Tags later once your model matures. But introducing them unnecessarily at the beginning can make an already complex RBAC model significantly harder to reason about, especially for teams new to Intune.
Bonus – PIM (Privileged Identity Management)
A short one, but important.
If you want to use PIM with your Intune RBAC roles, you can’t. However, there is a clean workaround.
The Solution – PIM Groups
- Create a PIM enabled group
- Assign the Intune RBAC role to that group
- Make your IT admins eligible to PIM that group
- Have your IT admins activate membership of that group when needed
In other words, you are not PIM’ing the role. You are PIM’ing membership of the group that holds the role. It works well and aligns properly with just-in-time access principles.
Final Thoughts
RBAC in Microsoft Intune is not something you “set and forget”.
If you get the foundations right and use custom roles where needed, team-aligned design, use of scope groups only when required, cautious use of scope tags, and just-in-time access through PIM – everything else becomes easier to manage, explain and defend in the future.
If you get it wrong, you will eventually need to redesign it and go again, instead of just tweaking and uplifting roles.
Design first. Tweak later.